GNS3 Lab Setup: Network Packet Analysis Simulation with Wireshark,Kali Linux,Cisco Router
Timeline:
00:00:00 Introduction(Setting up GNS3)
00:27:56 Setting up GNS3-VM for GNS3 Infastructure to work
00:49:23 Setting Up GNS3-Image on Vmware-workstation
01:31:40 Enabling GNS3-VM
02:14:23 Importing & Installing Custom Router
02:36:55 Router-Repository For Downloading Router-Images
02:54:11 Installing & Adding Router to GNS3
04:04:35 Importing & Installing Kali Image on GNS3
04:49:49 Setting Up Configuration of the Router for Kali to work
05:36:41 Problem fix with Virtual-Machines not starting
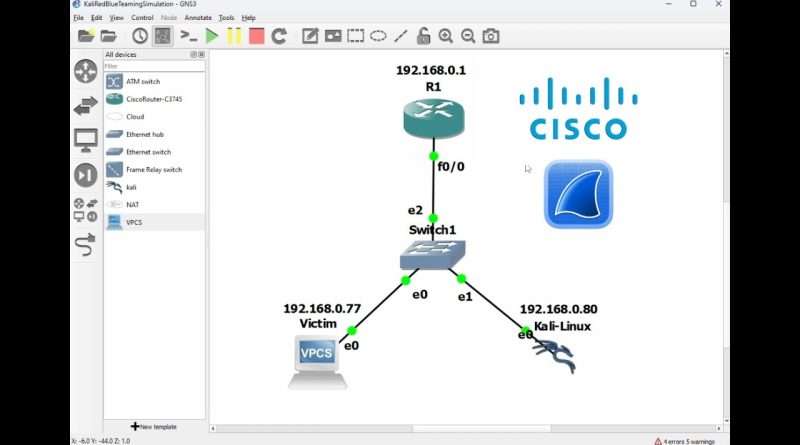
06:21:71 Setting Up Network-Topology / Infastructure
08:52:85 Setting Up Router-Interface Settings
11:14:14 Setting Up Machine-IP Assignment
11:54:51 Victim IP-Subnet Assignment
13:08:85 Kali-Linux IP-Subnet Assignment
15:07:67 Analyzing Network-Traffic with Integrated Wireshark Module
15:17:68 IP-Address assignment to the Graphical-Topology
17:15:51 Capturing Wireshark Traffic & Sending Packets
20:45:07 Thanks for Watching!
IOS-Router Image:
https://github.com/hegdepavankumar/Cisco-Images-for-GNS3-and-EVE-NG
Kali-Linux Image:
https://www.kali.org/get-kali/#kali-installer-images
GNS3-VM Image:
https://www.gns3.com/software/download-vm
In this video, I’ll walk you through the complete setup of a network simulation environment using Graphical Network Simulator-3 (GNS3). We’ll cover how to:
-Install and configure a custom Cisco IOS router within GNS3 to serve as the backbone of our network.
-Integrate VMware Kali Linux as a virtual machine, allowing us to perform network analysis and simulate client interactions.
-Add a default PC within GNS3 to act as a typical network device or « victim » machine.
-Configure subnetting on the Cisco router to assign IP addresses to connected devices, ensuring seamless communication across the network.
-Connect all devices through a virtual switch, placing them on the same network segment to facilitate packet transmission.
Throughout the setup, we’ll focus on:
-Simulating network traffic using protocols like ICMP (ping) to test connectivity between devices.
-Analyzing network packets to understand how data flows through the network.
-Monitoring for anomalies in traffic to gain insights into network security and performance.
This comprehensive tutorial is designed for beginners and intermediate users interested in networking, cybersecurity, or systems administration. By the end of the video, you’ll have a fully functional GNS3 lab environment where you can:
1. Practic networking concepts and configurations in a risk-free setting.
2. Experiment with different network topologies and device interactions.
3. Enhance your understanding of network protocols and security.
Contact:
https://www.instagram.com/xenjin450/
https://www.facebook.com/profile.php?id=100083216736496
https://www.linkedin.com/in/tawatchai-bartl-18605a275/
https://x.com/xenjin450
Developer-Page:
https://github.com/xenjin450
#GNS3 #NetworkSimulation #NetworkLab #CiscoRouter #KaliLinux #NetworkSetup #NetworkSecurity #TrafficAnalysis #PacketAnalysis #ICMP #ARPspoofing #Subnetting #CyberSecurity #NetworkingTutorial #VMware #Virtualization #CiscoIOS #ITTraining #NetworkInfrastructure #NetworkingBasics #linux #video #learning #studying #cisco #networking #network #xenjin450 #TawatchaiBartl #tawatchaibartl
Views : 609
network engineer
Source by Tawatchai Bartl (xenjin450)


