DIY Upgrade on a 1990 Macintosh Portable Computer – Atomic Pi SBC in a Original Mac
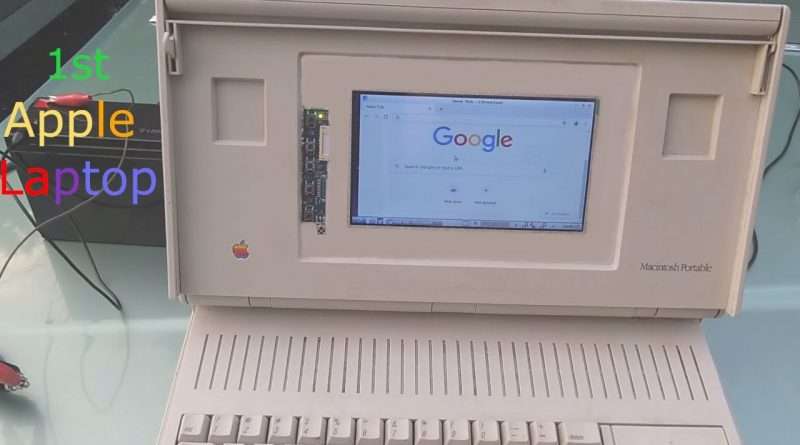
Quick video showing my Mac Portable project, Ive been working on this is 1990 Macintosh portable computer and upgrading it to a fully working x86 computer, still a work in progress. I also show a original Mac Portable turning on at the end of the video. This is an original Mac Laptop the first model was made in 1989 this one was made in 1991. This project is a work in progress I would like to get a screen that fits and get the internal keyboard and mouse working. This computer is fully functional you can stream 4k videos and play older server games it will boot windows 10, but I would just use the pre installed Linux. I ordered a Atomic Pi single board computer (SBC) off Amazon because it was fairly cheap and I figured I would do something with the board. I originally wanted to put it into a Macintosh 128K but than I remembered the Mac portable and figured it would be a better fit. I acquired a few of these portable computers from a relative, many of the computers where stored outside. The only one that used to work in 2012 doesn’t work anymore. The Atomic Pi is a single board computer, it’s called a Atomic Pi because it is so much more capable than the Raspberry Pi SBC boards that are bought by tech enthusiasts for many DIY projects. The Atomic Pi was originally a SBC for a German made companion robot, the project was canceled and the boards are being sold off. The boards specs – CPU: Intel Atom x5-Z8350 quad-core with 2M Cache. GPU: Integrated Intel HD Graphics. RAM: 2GB DDR3L-1600. Storage: 16GB eMMC, MicroSD slot.Graphics: Full HDMI port & primary audio out Ports: USB 3.0, USB 2.0 « camera » connector. All the info to connect up the board is on the site (Digital Loggers). To hookup the board you can by a breakout board if you don’t want to take any chances, but I decided to go all in and I bought a 26 pin header from Ali and soldered all the positive and negative wires to the right pins. I connected a plug to the camera plug to a female USB A plug to give me an USB 2 port you can find the wiring on google images. I also connected a switch to the power pins on the board. I connected all the WiFi antennas and Bluetooth. The display is a generic display I ordered off ebay it has HDMI and composite inputs plus remote you can buy these displays to install in your car for DVD players and etc. powers up by USB or 12v. Power supplies I used from ebay generic 5v I used two of them because the power supplies I bought were not enough amps to power the board and display etc. I would recommend getting one switching 8amp 12v and 5v power supply I’m going to switch mine out soon. I’ll leave some more info if anyone’s interested. Music is from YT copyright free library The end – Coyote Hearing. The rocket launch was from a copyright free video site. Big Thanks to my Subscribers hope you’re all doing good. If you’re new to the channel @kurtscottage Please consider Subscribing and turning on notifications. Thanks for Watching
Peace
Views : 967
macintosh


